Then it came to me - I'd enter stuff that was a bit more obscure, something that most people don't do but that I think is fun and want to share the fun of it. This made it possible for me to share something that isn't finished and a lot of times not get a ton of criticism, or if I did get criticism I could brush it off easier since it was just something for fun. The first thing I did with this was a pink faux fur edged viking coat - that was completely period! :D Yep, vikings made pink faux fur. I'll have to do a separate blog entry on that I think. Sure enough, the judges were very surprised to see my documentation and research and thought it was fun.
Ah yes, documentation. For some it's a 4 letter word and for me it was at first. One of the biggest reasons for this is I learned how to do research in college and I confused research with documentation. Documentation for an A&S competition is supposed to be a very simple 1-2 page write up that explains what you made, how you made it, why, etc. etc. so those who are judging it have a better idea of what they are judging. All that cool research - like the proof of Vikings making faux fur - you can add as an appendix and if the judges want to see it they can but they don't have to see it to understand what you made. I was very happy to hear that the judges all wanted to see my appendix with the faux fur - since in a lot of ways that's what I want to share even more than my own made entry.
Another thing that helped a lot was this:
Kitten’s Rules for
Documentation
(Kitten Reames, mka: Duchess Caterina de Forza d’Agro, OL,
OP, Atlantia):
1. What is this?
2. Describe the region and date I might see one in the Middle Ages. (Example: 1400-1450, England).
3. Do you have any pictures or photocopies of ones from the Middle Ages? Circle: Yes/No
If yes, please display with your entry. If pages are in a book, please mark pages with post-it/sticky markers.
4. List up to 5 sources/books that were the most helpful to you in learning about this project. Include Title, Author’s name, date published, publisher/web URL and one sentence listing what made that source useful for this PARTICULAR entry. Example: Amman, Jost, 1539-1591. Kunstb=FCchlein. Pictorial archive of decorative Renaissance woodcuts. New York: Dover, [1985] c1968. I found a period picture showing details of how parchment was prepared.
5. What did you use to make your entry? (list raw materials used).
6. What were the ones in the Middle Ages made of?
7. What steps and tools did you use to make it?
8. What steps/tools were used to make ones in the Middle Ages?
9. If the answers to5+6 and/or 7+8 above are different, how and why are they different? (Example Materials: It is illegal to buy modern ivory and I can’t afford legal, antique ivory, so I used Sculpy clay instead. Example Tools: While a medieval garment would be hand sewn, I chose to use a sewing machine )
OPTIONAL:
10. What do you like best about your entry?
11. What would you like to change if you could?
1. What is this?
2. Describe the region and date I might see one in the Middle Ages. (Example: 1400-1450, England).
3. Do you have any pictures or photocopies of ones from the Middle Ages? Circle: Yes/No
If yes, please display with your entry. If pages are in a book, please mark pages with post-it/sticky markers.
4. List up to 5 sources/books that were the most helpful to you in learning about this project. Include Title, Author’s name, date published, publisher/web URL and one sentence listing what made that source useful for this PARTICULAR entry. Example: Amman, Jost, 1539-1591. Kunstb=FCchlein. Pictorial archive of decorative Renaissance woodcuts. New York: Dover, [1985] c1968. I found a period picture showing details of how parchment was prepared.
5. What did you use to make your entry? (list raw materials used).
6. What were the ones in the Middle Ages made of?
7. What steps and tools did you use to make it?
8. What steps/tools were used to make ones in the Middle Ages?
9. If the answers to5+6 and/or 7+8 above are different, how and why are they different? (Example Materials: It is illegal to buy modern ivory and I can’t afford legal, antique ivory, so I used Sculpy clay instead. Example Tools: While a medieval garment would be hand sewn, I chose to use a sewing machine )
OPTIONAL:
10. What do you like best about your entry?
11. What would you like to change if you could?
I used this outline for the latest entry I did and was very excited to present my entry. Of course, events can get a bit busy with all the other activities so I thought I'd share it here so I could easily share it with those who didn't get to see it. Plus, it is something fun and cool that I think is fun to share. So here we go!
I was really happy with how the presentation was. I took a thick piece of cardboard and covered it with a thick velvet type fabric and then I pinned each Posament to the fabric along with a small slip of paper label.

Viking Posament
Documentation
By Lady Tabitha
de Luna
This entry is a sampling of Viking
Posaments which are decorative ornaments made of wire or thread which is
braided and/or knotted and then sewn onto textiles. Basically they are like Celtic
knotwork done in gold wire. Posaments have been found in Viking graves
including Birka, Uppland, and Hedeby contained posaments, the most being found
at Birka. 45 of the 1,160 graves at Birka had posaments dating these at 9-10th
century but the findings from the other graves appear to be older. Most of the
findings were in male graves and appear to have decorated headbands, hats, or
purses based on location but there have also been small ornamental pieces found
at the end of stings or as standalone pieces that could have been used like
sequins. The posaments came in different
types including borders, small knots used like sequins, and three dimensional
decorative knots such as the Turk's head knot.
I
was unable to find any information about how to make these other than the idea
of them being braided and or knotted so I observed the extant pieces as well as
replicas made by other people (Appendix A) All of the information I found about
posaments was from online and the majority of the sites were in another language
which made research a bit difficult. I did find a wonderful handout in English
by Meisterinne Katheryn Hebenstreitz (Annika Madejska) and some wonderful
information from Rieke who does many posament reconstructions both replicating
the extant finds and designs inspired by them. (Appendix B) It was also helpful
to find out that modern day Sami jewelry, a Swedish art made by the indigenous
Sami people is the same kind of technique and is believed to have been brought
to the Sami by the Vikings. (Appendix C) The most helpful information for
making the posament has been tutorials for decorative knot bracelets and other
knots such as a Turk’s head knot. (Appendix D) A list of the sources and why
they were useful is at the end of this documentation.
To make the posaments, I used gold
dmc floss, gold 28 gage bead wire, and silver 24 gage craft wire. The original
posaments were made with real gold thread and spun silver which was silver
thread wound around a silk core. My research says that the posaments were
worked completely by hand without any tools but I felt it would be best to
attach the wire to something to give it stability so my first piece (labeled A)
was made by folding the wire in half to make a loop and clipping the loop to a
chair.


Having a lot of experience in hair braiding I believed it would be easy
to braid the thin gold wire and that I could make the posaments quickly. I
found out quickly that braiding in the way I do hair did not achieve the
desired look in any way and the thin 28 gage wire was a bit delicate. So I
tried out the knotted design that I had found a tutorial for. I then tried the
same design with the gold dmc floss (labeled B) and found I could control the
floss better but the design didn’t show up as well and the dmc floss twisted
but that can be fixed when the posament is sewn down. I was not able to get the
dmc floss to work for some of the other designs, mostly only the knotted
design.
 |
| this was what I set up to be able to knot the wire and dmc floss |


In trying out some of the other designs and
having a difficult time I endeavored to use some tools mainly a bent flat nose
pliers but I also tried to make a jig with small nails hammered into a piece of
wood. The jig was essential for the piece I made with the 24 gage silver wire
(labeled C) but I couldn’t get it to help with the other pieces I made.


In trying to get uniformity I did a combination of using the nails on the jig and just holding the other pieces in my hands and using the pliers. These smaller pieces (labeled D) were made without any instruction, just simply by viewing pictures of the extant and recreated pieces and trying to stumble my way through them. I have had a little bit of experience with jewelry making and wire work but was not prepared for how hard this would be and most of the pieces were undone and redone as I figured out how some of the designs worked. Most of the pieces I hammered a bit with a wooden hammer on the wood side of jig I made (hence the dents) since I had heard that helps to strengthen wire pieces and to help smooth them out.


In trying to get uniformity I did a combination of using the nails on the jig and just holding the other pieces in my hands and using the pliers. These smaller pieces (labeled D) were made without any instruction, just simply by viewing pictures of the extant and recreated pieces and trying to stumble my way through them. I have had a little bit of experience with jewelry making and wire work but was not prepared for how hard this would be and most of the pieces were undone and redone as I figured out how some of the designs worked. Most of the pieces I hammered a bit with a wooden hammer on the wood side of jig I made (hence the dents) since I had heard that helps to strengthen wire pieces and to help smooth them out.


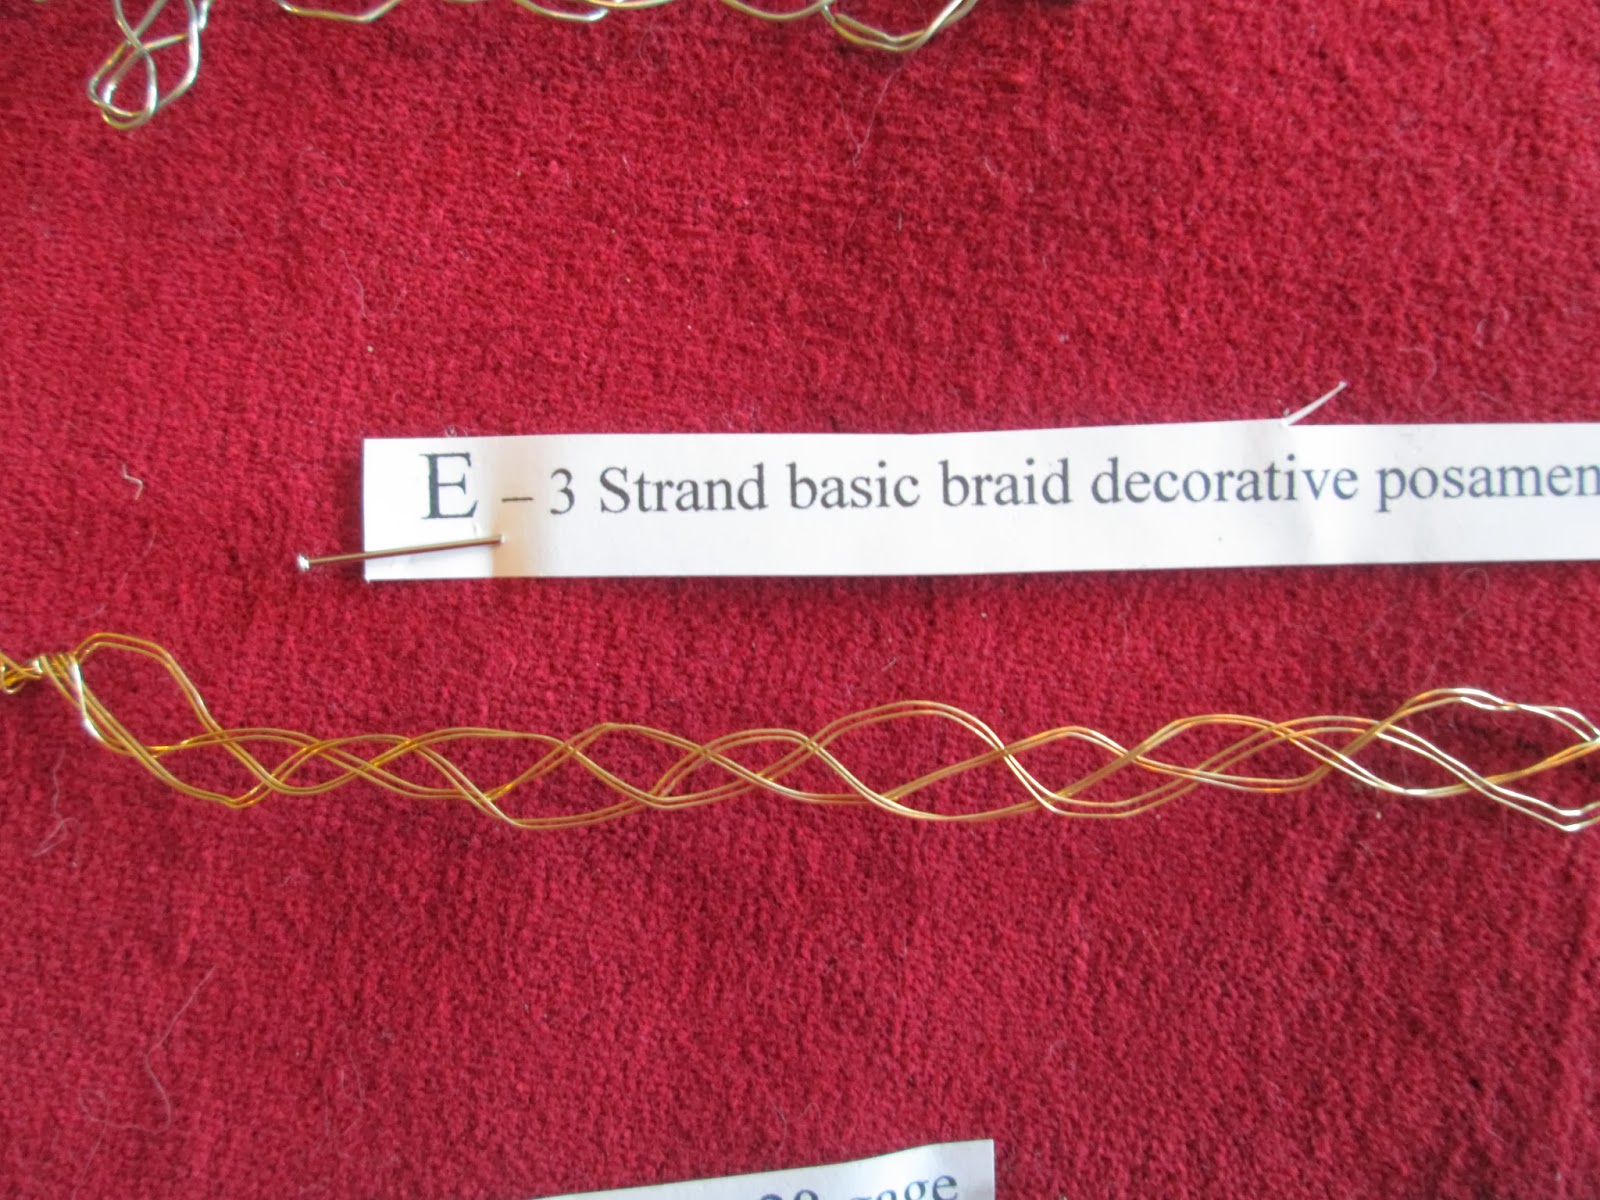
I wanted to try and have a braided
example and found that rather than holding the wire down the way I would hold
hair, I had to bend the wire to the side as I braided to achieve an open look
(labeled E).


Piece F is a small sample of one of the knots I tried to figure out.


The Turk’s head knot (labeled G) was made around a cylinder (the spool of dmc floss)


Piece F is a small sample of one of the knots I tried to figure out.


The Turk’s head knot (labeled G) was made around a cylinder (the spool of dmc floss)


All of these samples are beginner pieces as I am just starting to learn how to make them. I am happy with some of the pieces when seen from a distance but I am also pleased with what I was able to come up with considering the lack of available research. What I like best about my entry is that it is something I haven’t ever seen anyone else do and so I wanted to share all the pieces I made to share something new and fun to use as decoration on Viking garb and accessories. If I could change anything I would want to use thicker wire and try out some other decorative knots that have tutorials online and in books. I would also want to make some finished pieces that were smoother and more refined which would come with more practice.
Research:
About
Posaments. Rieke. October 11, 2009 First Viewed April 2013, last viewed
November 7, 2013 http://www.silberknoten.de/en/index.php?id=2 This is the
site that introduced me to posaments. Rieke has a wonderful article telling
about the history of posaments and showing some extant pieces but I was mostly
inspired by her reproductions which helped me to see what posaments are
supposed to look like and inspired me to try my own.
Posament
Pretty knots from Birka. Meisterinne Katheryn Hebenstreitz (Annika Madejska)
June 24, 2013, First Viewed July 2013 last viewed November 7, 2013 http://textiletimetravels.files.wordpress.com/2010/08/posamenthandoutfinal.pdf A great handout
with a lot of information about posaments, what they are made of, where they
are found, and a lot of pictures of extant pieces.
Sami
Bracelets and Jewelry. Nomadic Artistry. viewed November 6, 2013 http://www.nomadicartistry.com/Home_Page.html This site had
some history information about Sami Bracelets as well as a lot of photos of
modern day pieces that helped me to see the connection between these and
posaments.
Turk's
Head (Woggle) Knot. Animated Knots by Grog. July 1, 2013, viewed November 7,
2013, http://www.animatedknots.com/turkshead/index.php?Categ=decorative&LogoImage=LogoGrog.jpg&Website=www.animatedknots.com This site has
step by step pictures and instructions for how to do knots and it was the only
way I figured out how to do a Turk’s Head.
Appendix A


 Appendix B
Appendix A

 |
|
|

Posaments
- Ornaments of the Birka vikings
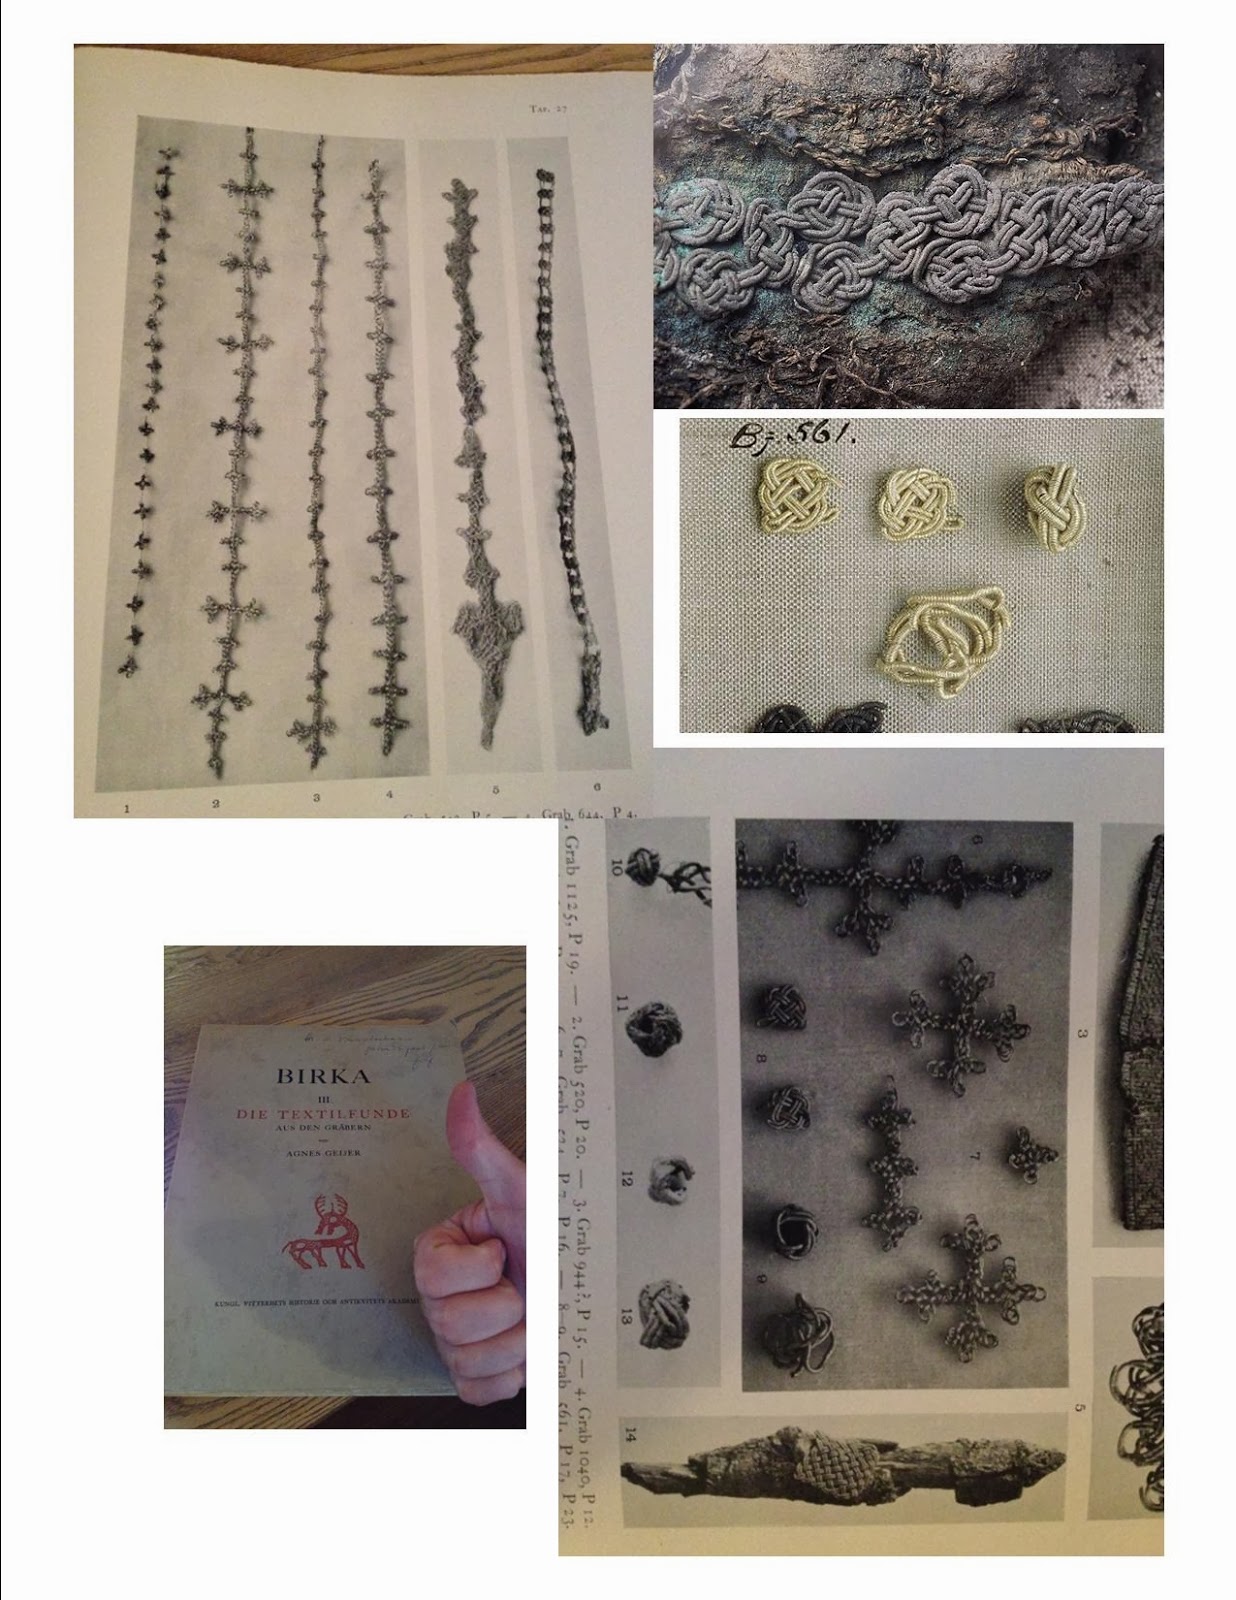
The word "posament" has its origines in the french word "passement" which means applicated onto textile material. Agnes Geijer states in her work about posaments that the choice of the word "posament" is not always ideal or hundred percent correct, but because of the similarity to younger pieces of textile decorations she agreed to use this term for all the knotwork and all the braids made out of silver or gold wire in Birka III.
The posaments found in Birka are continuous patterns of braids and/ or knots that were made without tools. The loops and twists were carefully tightend by hand to reach the extreme filigrane results. It is hard to make a difference between knots and braids. Some troves show only one or the other, others contain a mix of both which also contributes to the difficulty of a correct wording.
The material that was mainly used was straigth golden thread, very little spiral gold and only very rare spun gold. Silver was only found in the spun version (I am still looking for somebody providing this highly delicate material!). In most cases two parallel threads were found but there also exists some work with three or more threads
Different types of posaments:
1.) Continuous borders oder braided strings that were fixed on top of the textile.
2.) Border decorations that were sewed on to the end of a textile.
3.) Decorative little knots, sewed on like sequins
4) Flat objects that were found at the end of slim silk strings;
5) Three-dimensional knots that were also placed at the end of silk bands or strings like in 4)
(Pictures can be found in the Galery)
The archeological troves
The different knots and braids were found in 9 burned graves. One of these is a female incremation with two posament troves. Only one other burned grave with unknown gender contains two troves in one grave. The other unidentified graves contain each one braid and one knot, likewise the two graves that were identified as male incremations.
Also the graves with bodies only provide one female grave with posament troves (Grab 557) that contained 8 pieces. Only 6 male graves with bodies contained knots or braids. Only grave 520 contained 12 posament pieces and grave 561 6 pieces. Additionally grave 886 must be mentioned with one braid and one knot.
The braided and knoted borders are not much more numerous, 11 troves were found in as male identified graves with bodies, thee troves were counted in not identified burned graves.
Only grave 798 contained 2 different braided and knoted borders, in all other graves it could only be detected one or the other.
Out of the 29 graves with posament troves only the ones with remaining bodies contained the braided and knoted borders. In only five out of 29 graves were found both knots and braids in one grave.
Having in mind the high number of over 1100 graves in Birka the amount ouf posament troves can be stated as very little. Leaving the archeological site of Birka there is very little evidence of other identical posaments at that time. I only know of the following troves:
- One cremated grave in Kirchspiel Aringsas, Alvesta, Värendsgatan; Smaland SHM Inventar Nr. 19803:5 knot or bead as an ending of a textile string made out of silver wire. (O-Text: "knut, flätad av silvertrad; pärla, flätad av silvertrad"; the mentioned "pärla" is most probably the from A. Geijer as knot identified object.
- 3 ca. 10mm big golden crosses from Adelsjö
- one fragment of a cross from Vagsnes, Sogn och Fjordane
- thirty little crosses or knots in a trove from Bjelvretschenskaja in Kuban*
If anybody knows of other archeological evidence I would be more than interested into the whereabouts.
As a result of this little summary it can be stated that posament troves were equally often found in Birka of the 9th and the 10th century. Posaments were mainly used as a male decoration or better as textile ornaments on man's clothing. That the cremated graves were richer than the graves with remaining bodies can only be assumed.
Quelle:
"Birka III, Die Textilfunde aus den Gräbern", Agnes Geijer, Uppsala 1938
*) A. Geijer was leading this archeological site, Lit. Atchet Archeol. Komm 1896, Abb. 211, my own research remains without result concerning this source.
The word "posament" has its origines in the french word "passement" which means applicated onto textile material. Agnes Geijer states in her work about posaments that the choice of the word "posament" is not always ideal or hundred percent correct, but because of the similarity to younger pieces of textile decorations she agreed to use this term for all the knotwork and all the braids made out of silver or gold wire in Birka III.
The posaments found in Birka are continuous patterns of braids and/ or knots that were made without tools. The loops and twists were carefully tightend by hand to reach the extreme filigrane results. It is hard to make a difference between knots and braids. Some troves show only one or the other, others contain a mix of both which also contributes to the difficulty of a correct wording.
The material that was mainly used was straigth golden thread, very little spiral gold and only very rare spun gold. Silver was only found in the spun version (I am still looking for somebody providing this highly delicate material!). In most cases two parallel threads were found but there also exists some work with three or more threads
Different types of posaments:
1.) Continuous borders oder braided strings that were fixed on top of the textile.
2.) Border decorations that were sewed on to the end of a textile.
3.) Decorative little knots, sewed on like sequins
4) Flat objects that were found at the end of slim silk strings;
5) Three-dimensional knots that were also placed at the end of silk bands or strings like in 4)
(Pictures can be found in the Galery)
The archeological troves
The different knots and braids were found in 9 burned graves. One of these is a female incremation with two posament troves. Only one other burned grave with unknown gender contains two troves in one grave. The other unidentified graves contain each one braid and one knot, likewise the two graves that were identified as male incremations.
Also the graves with bodies only provide one female grave with posament troves (Grab 557) that contained 8 pieces. Only 6 male graves with bodies contained knots or braids. Only grave 520 contained 12 posament pieces and grave 561 6 pieces. Additionally grave 886 must be mentioned with one braid and one knot.
The braided and knoted borders are not much more numerous, 11 troves were found in as male identified graves with bodies, thee troves were counted in not identified burned graves.
Only grave 798 contained 2 different braided and knoted borders, in all other graves it could only be detected one or the other.
Out of the 29 graves with posament troves only the ones with remaining bodies contained the braided and knoted borders. In only five out of 29 graves were found both knots and braids in one grave.
Having in mind the high number of over 1100 graves in Birka the amount ouf posament troves can be stated as very little. Leaving the archeological site of Birka there is very little evidence of other identical posaments at that time. I only know of the following troves:
- One cremated grave in Kirchspiel Aringsas, Alvesta, Värendsgatan; Smaland SHM Inventar Nr. 19803:5 knot or bead as an ending of a textile string made out of silver wire. (O-Text: "knut, flätad av silvertrad; pärla, flätad av silvertrad"; the mentioned "pärla" is most probably the from A. Geijer as knot identified object.
- 3 ca. 10mm big golden crosses from Adelsjö
- one fragment of a cross from Vagsnes, Sogn och Fjordane
- thirty little crosses or knots in a trove from Bjelvretschenskaja in Kuban*
If anybody knows of other archeological evidence I would be more than interested into the whereabouts.
As a result of this little summary it can be stated that posament troves were equally often found in Birka of the 9th and the 10th century. Posaments were mainly used as a male decoration or better as textile ornaments on man's clothing. That the cremated graves were richer than the graves with remaining bodies can only be assumed.
Quelle:
"Birka III, Die Textilfunde aus den Gräbern", Agnes Geijer, Uppsala 1938
*) A. Geijer was leading this archeological site, Lit. Atchet Archeol. Komm 1896, Abb. 211, my own research remains without result concerning this source.

Source: Picture 59488; SHM 2001-05-01 excerpt from the online catalogue of:
Historiska museet 2009, Stockholm, Sweden
Go to Replica of Birka Grave 644, P4
1. Birka Grave 542 Original, P5

Source: Picture 59489; SHM 2001-05-01 excerpt from the online catalogue of:
Historiska museet 2009, Stockholm, Sweden
Go to Replica of Birka Grave 542, P5
2. Birka Grave 736 Original, P8

Source: Picture 59490; SHM 2001-05-01 excerpt from the online catalogue of:
Historiska museet 2009, Stockholm, Sweden
http://www.housebarra.com/EP/ep07/02trim.html
Knotted Trim from Birka
I missed the picture the first few
times I flipped through Cloth and Clothing in Medieval Europe. It showed
a section of a man's coat from Birka (Norse, approx. 1000 A.D.) with an
intricate interlace trim. On close examination, I discovered that the trim was
composed of silver spiral wire arranged in decorative knots in a cross pattern.
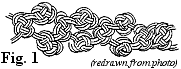
(fig. 1). The resulting trim was stitched to a strip of silk and then to the
garment fabric, which allowed the trim to be removed from the garment and
reused with little difficulty. This technique has all kinds of possibilities
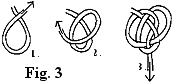
for making period and yet simple and affordable trim. Below are directions for
making the 'Josephine's knot' (fig. 2) and the 'Turk's head' knot (fig. 3) used
in this particular example.
    |
Since spiral silver wire is hard to
find, you can use linen, wool or silk-like cord. There is also a metallic cord
with wire inside that is carried by some craft shops. It is more brittle than
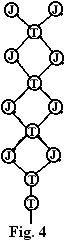
pure silver or gold wire would be, so keep that in mind. Try to get your knots
the same size and evenly spaced. The best way to do this is to plot lines for
the connecting cords (fig. 4). Pin this paper to a section of drop-ceiling
tile, a fabric bold board or a piece of heavy corrugated cardboard. Pin your
knots to the paper pattern as you work to keep the pattern even.
Sources:
Geijer,
Agnes Birka III: Die Textilefunde aus dem Graebern. Uppsala, 1938.
Harte,
N.B. and Ponting, K.G. ed. Cloth and Clothing in Medieval Europe.
Heinemann Educational Books, 1983.
I also had a printoff of this great handout http://textiletimetravels.files.wordpress.com/2010/08/posamenthandoutfinal.pdf
Appendix C
Sami Jewelry
http://www.swedart.com/lapland_Jewelry_info.htm
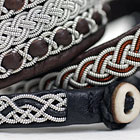
History: SwedArt’s™ aboriginal Sami artisans reside near the Arctic
Circle in northern Sweden. Sami People with a 10,000 year old history live in
Norway, Sweden, Finland, and the Kola Peninsula in Russia and lived on the land before the
rest of the Scandinavians arrived. There are 17,000 Sami (formerly called
Laplanders) in Sweden today. Approximately 3,000 own herds,
sometimes with thousands of domesticated reindeer (caribou), and reindeer
husbandry is their livelihood. Only Sami can own reindeer in Sweden so we
support the small indigenous Sami People by buying products made of traditional
Sami materials like reindeer leather and reindeer antler. Their unique craft items are admired and sought after
worldwide.
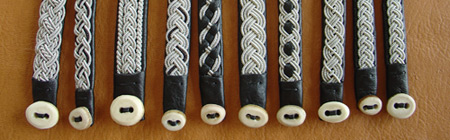
Sami embroidery with pewter wire on reindeer leather and
fabric has been done for hundreds of years in the Sami culture, and Sami
actually invented the spun pewter wire. In the old days, they melted tin to
make the wire and then spun it around reindeer sinew entirely by hand. Today,
the wires are spun on a small machine.

Appendix D