A little over a year ago I was a Primary teacher in my church. When the Bishop and his Councilors gave me and my husband the call I was actually rather stunned and I don't remember exactly what I said but it was something along the lines of "Have you seen my husband?" since he's not really the super kid friendly image, don't get me wrong, he's a wonderful dad and all and he's great with teenagers but when I was a Nursery teacher (over the 18 month olds to the 3 year olds) I had him come help me one day and he literally stood there for most of the time having no idea what to do being surrounded by small children. Before I could question further though, one of the Councilors brought up how it was a class of all boys around 6-7 years old, and some of them were a bit um, hard to handle. It all became clear then as my husband worked at a boys home and got his first bachelor degree in recreational management and youth program and knew a lot about how to handle rougher kids.

Yep, my husband became the Primary bouncer. :) He does have a slightly Harley Davidson look to him since he is 6'2" and has long blonde hair and a mustache and goatee. And yes it was a rough class - I would come home from church
exhausted. I have kids, and my boy is quite the handful himself. The biggest issue with this class was there was more than one hard to handle kid and they were hard to handle in different ways. We had a very aggressive boy who acted up constantly so most of the time Ian held him on his lap while the boy scratched his arms up. There were a few times I tried to hold him - boy was that crazy; got some nice bruises that day. Then there was a boy who was
passive aggressive. If he acted up to the point I had to put him on my lap, he would become as limp as a rag doll and just kind of lay there not caring. There was a boy that was so fun, we'd ask a question about God or the scriptures and he'd raise his hand and give an answer like "Did you know you can tell a Whales age by his earwax?" Or he'd talk about dinosaurs since he knew all sorts of official names and such. We also had a boy that didn't talk. He had a literal condition where he couldn't talk to anyone besides family and a few friends. Happily he overcame that and talks a lot more to everyone now but it was a very interesting mix indeed.
Despite the craziness of it all, I did become attached to the boys and it's nice seeing them in the halls every now and then and some of them seem to still like me. Really they are all great boys, it was just combining them all (I hear the voice of Captain Planet in my head, "By our powers combined" LOL) and trying to get them to sit still quietly through sharing time and then sit for a lesson in a teeny tiny room was not the easiest task in the world. The really interesting thing too is it seemed to be the perfect thing to have us be their teacher - when it came time for the Primary program where the kids are all up front during the main sacrament meeting (that's 1 hour and 15 minutes sitting away from their parents, up in front for all to see, and in these lovely rocky squeaky chairs too) our class was the most well behaved. Other classes had kids rocking their chairs a bunch or talking or poking each other. Our boys all sat like angels. Sure they didn't really sing - we told them that was fine, just to move their mouths to look like they sang - but they did their parts and were really great. It probably was also due to my husband promising to give them a whole candy bar if they were good - yes bribery works some times ;)
So how does this all tie in to the paper CTR rings? Some of you may even be wondering what a CTR ring is in the first place - long story short, it stands for Choose The Right and to learn more about my religion you can go
here. For the Primary classes, there are manuals with lessons in them. One of the lessons I was preparing for our rambunctious boys talked about the kids having a CTR ring. I thought about this and how 1. we didn't really have the funds to get all the boys a ring, 2. a small thing like that is pretty easy for a young kid to loose and 3. wouldn't it be nice to have something we could use for the lesson that wouldn't be expensive and would be ok if it got lost or broken or if the kids didn't really care for it after 10 minutes?
And so - I created a paper CTR ring! Quick and easy, kid size, colorable, cheap, and no big worry about the kids loosing them/taking good care of them the way you would with a ring you bought. Without further adieu and rambling, here are the templates and pictures of how to assemble the rings - this is one of the few post that I do kind of hope people share and freely enjoy.
Print out your ring. It's best to print it on thicker paper such as cardstock but it also works on plain paper. Cut out all around and then cut where there's the dark line - but DON'T cut all the way through. You can see in the picture above how it's only cut half way where the dark line ends.
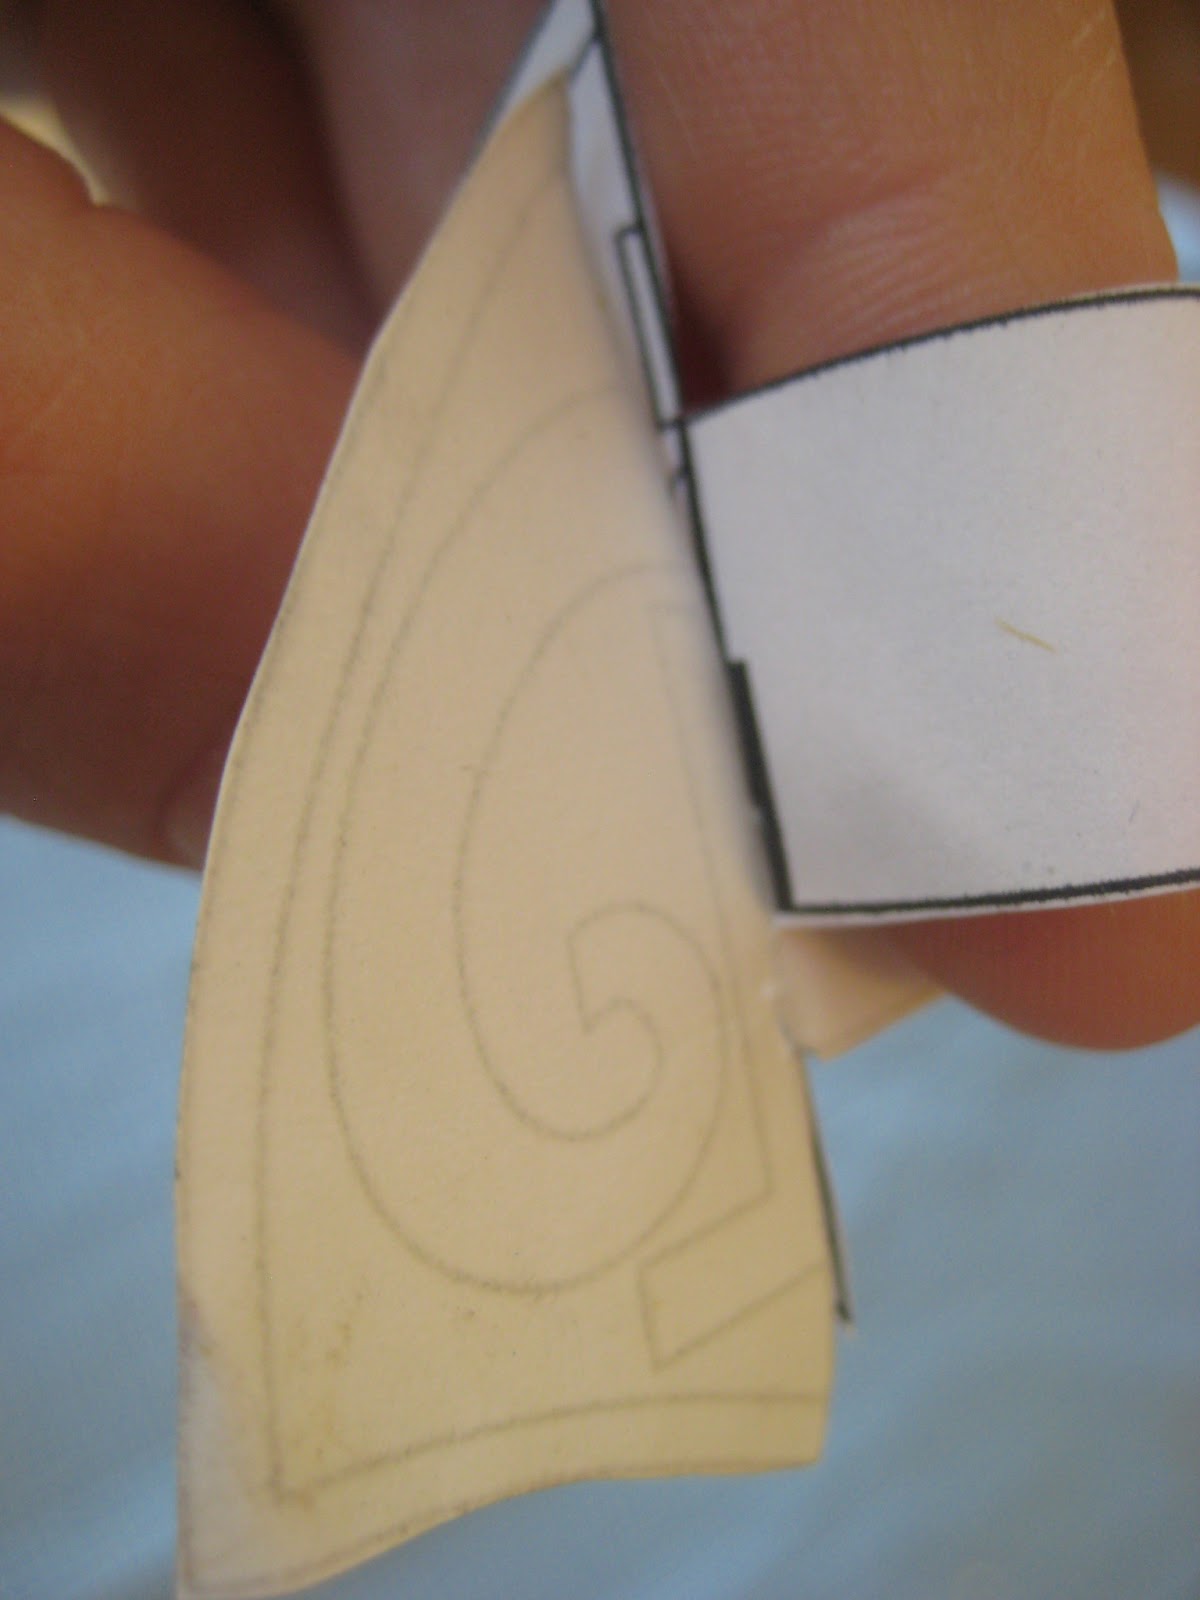
This next part is a little tricky, I hope my explanation and the pictures come out clear enough for you to understand. You want to twist the paper around so the two halves of the CTR shield are close to each other and so the slits you cut are next to each other and then the two halves should slide together.
Here you can see the two halves starting to slide together.
Here's a closeup of the intersection.
Here's a closeup of the inside. I put a piece of scotch tape on the inside where the two sides meet to help hold it all together. You can also put tape on the front if it's not sitting the way you want.
As you can see, they come out a bit small four adult fingers, but they work great for little fingers.
Perfect! The kids really loved them and they fit their little fingers really nicely. The kids also liked being able to color them with whatever colors they wanted.
This is a whole sheet of them - I was able to fit 7 to a sheet. I hope you can copy and print this image ok and have it come through clearly. I can't figure out a way to attach a pdf of it so it's to the right proportion and all. But if nothing else you can copy that first image which is only one ring but it's nice and big so it should come through clearly.